Claw Machine
15 December 2022
A Project By Victoria Hathaway(vh226) and Lily Yu(gly6)
Demonstration Video
Introduction
For this project we took a generic arcade claw machine and redesigned it to be fully operational through the Raspberry Pi 4 and piTFT screen. To make the machine more exciting we implemented three modes that the user can choose from. The first mode fully utilizes the piTFT screen and in lieu of traditional joysticks, the user is presented with arrows and a drop button on the screen to retreive their prize. The second mode utilizes the piCamera attached to the claw as well as the touch screen which allows for the user to choose an object in the machine which prompts the piCamera to search for the object within the machine utilizing openCV. The user is able to see what the camera sees on the piTFT screen, but the Raspberry Pi has full control of the movement of the claw. The third mode implements wireless capability where a Raspberry Pi Zero is connected to an accelerometer and button which communicated with the Raspberry Pi 4 to allow the user have full control of the claw machine from a distance. The camera is initialized in accelerometer mode as well so the user also has the option to look at the claw machine normally or through the camera.
Project Objective:
The goal of this project is to redesign the classic claw machine arcade game by implementing three different modes for the user to choose from. The first mode, manual mode, would allow the user to use the piTFT screen to manually move and drop the claw for a chosen item. The second mode, automatic mode, first ask the user to choose an object that in the machine. The camera attached to the claw would then locate and collect the item for the user, dropping it in the prize chute. The last mode, accelerometer mode, implements wireless capabilities to allow the user to control the claw machine with the use of an accelerometer and buttons.
Hardware Design
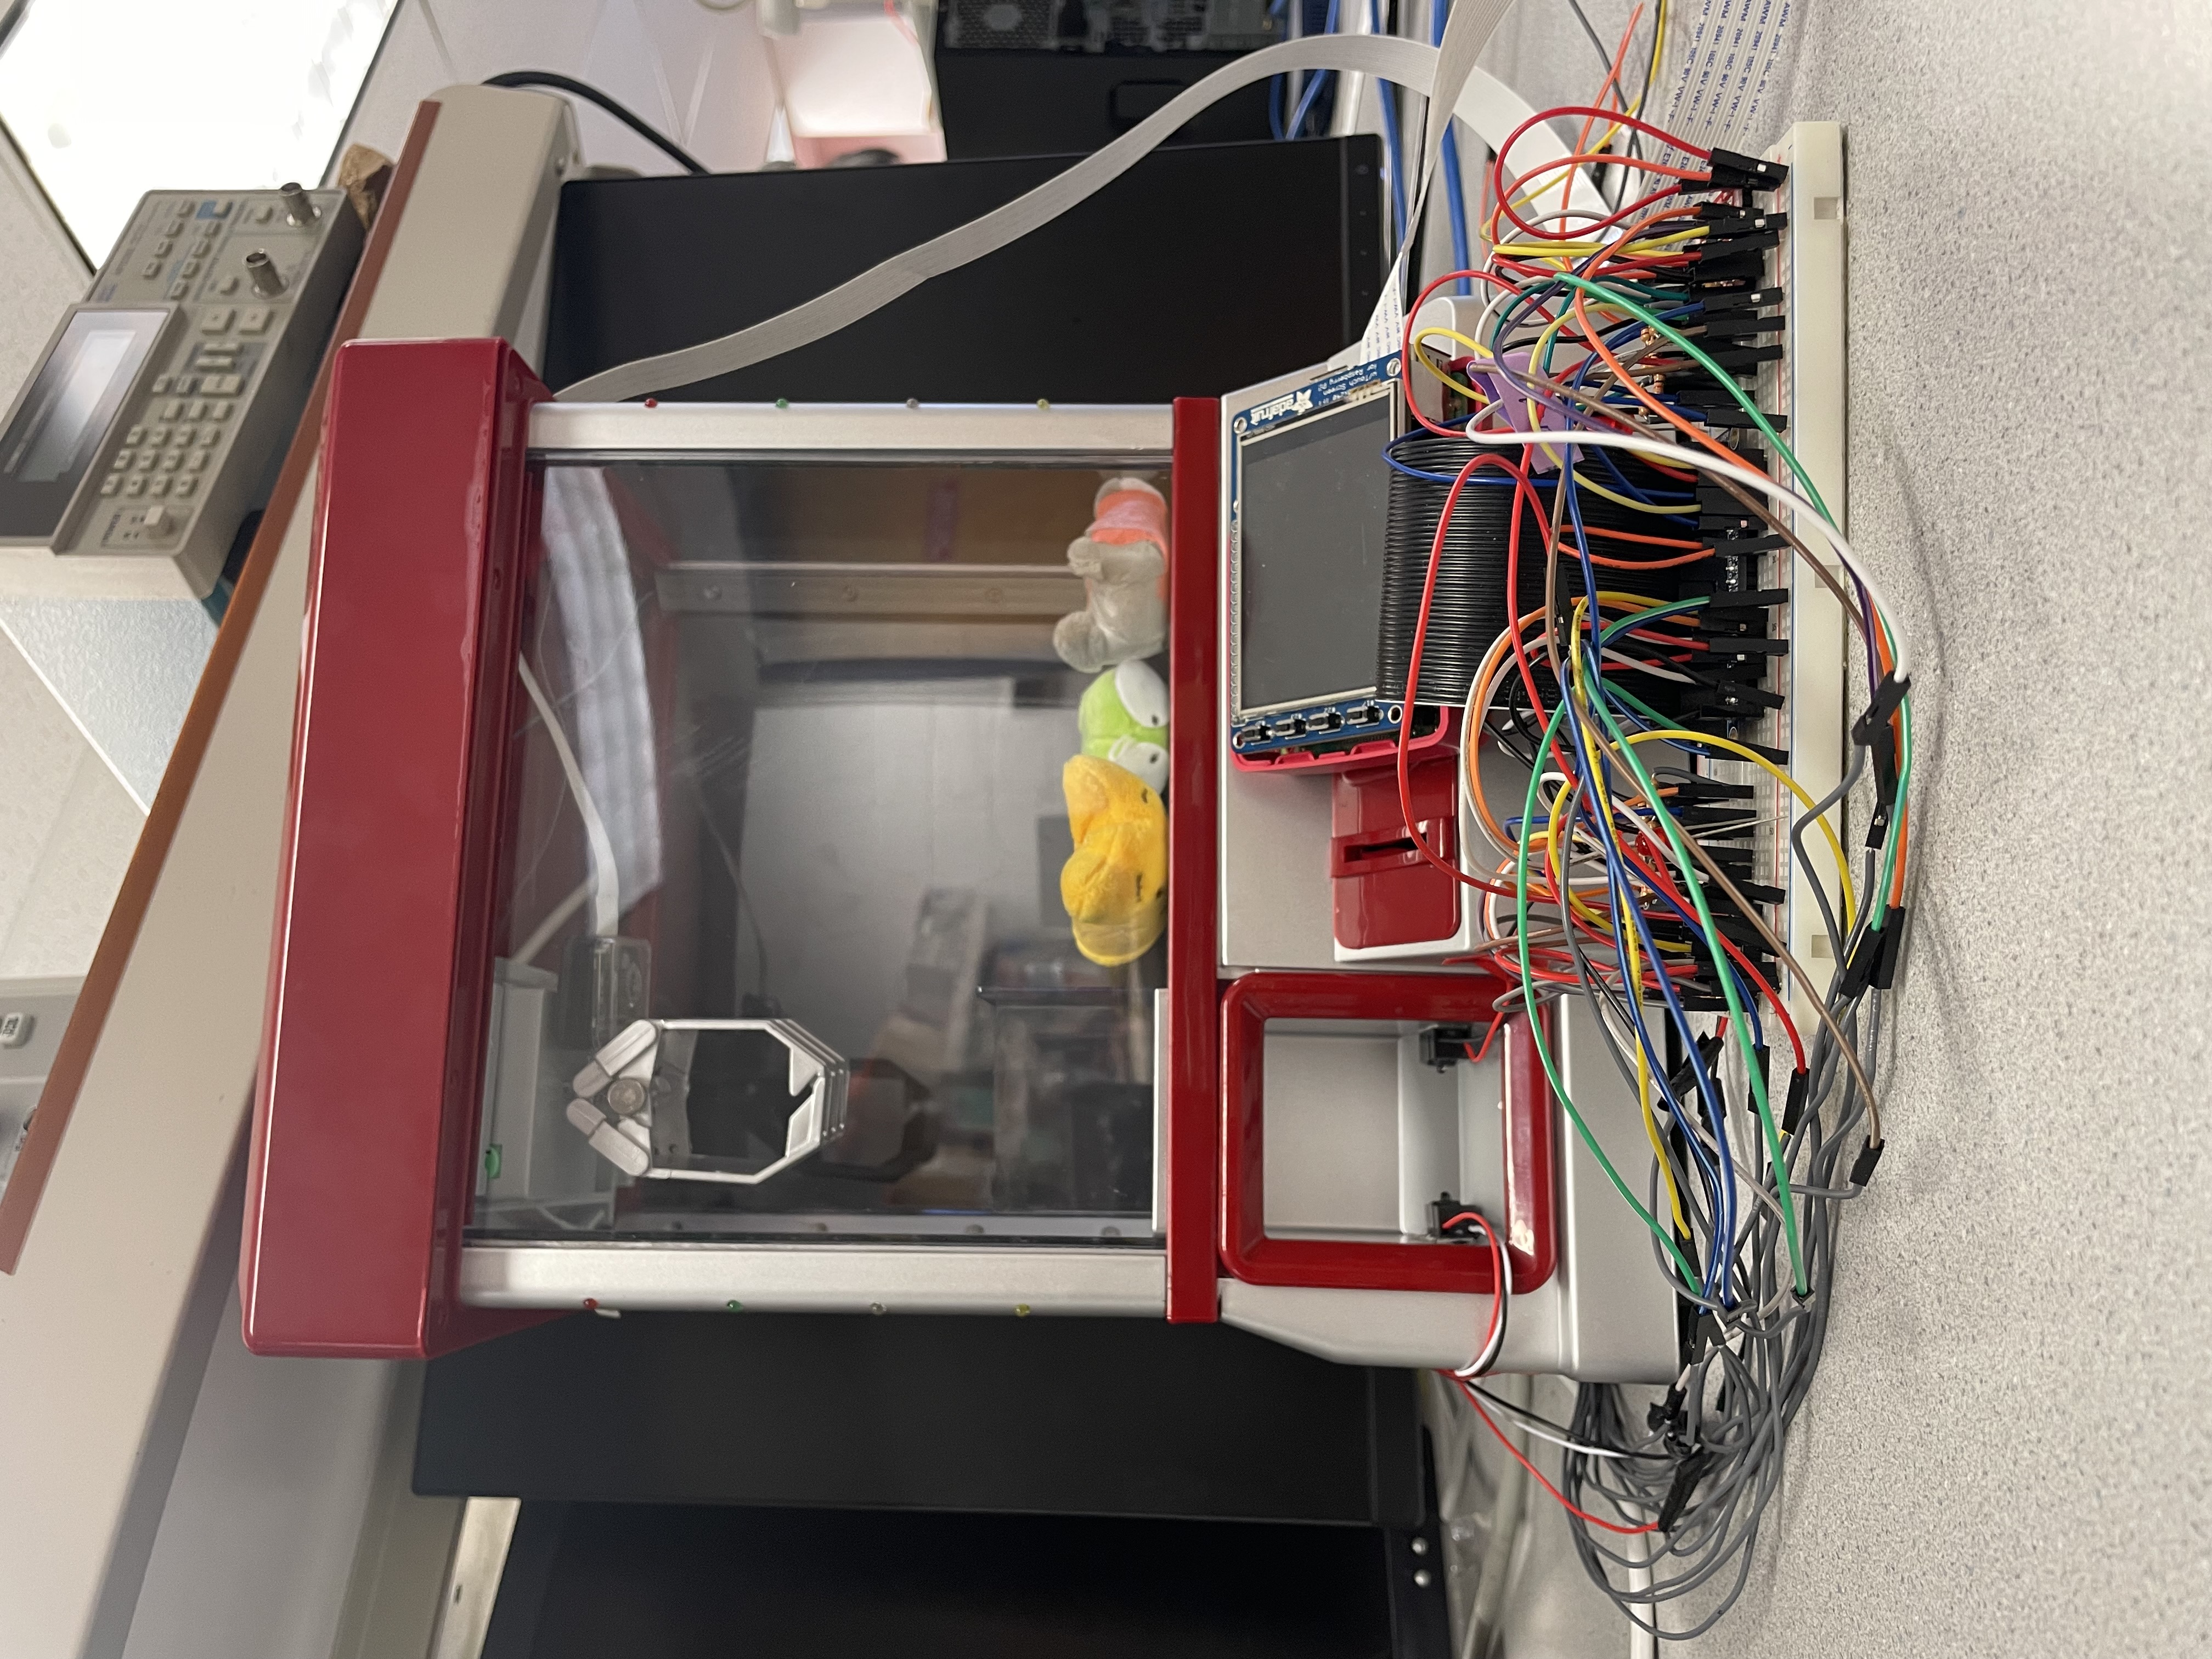
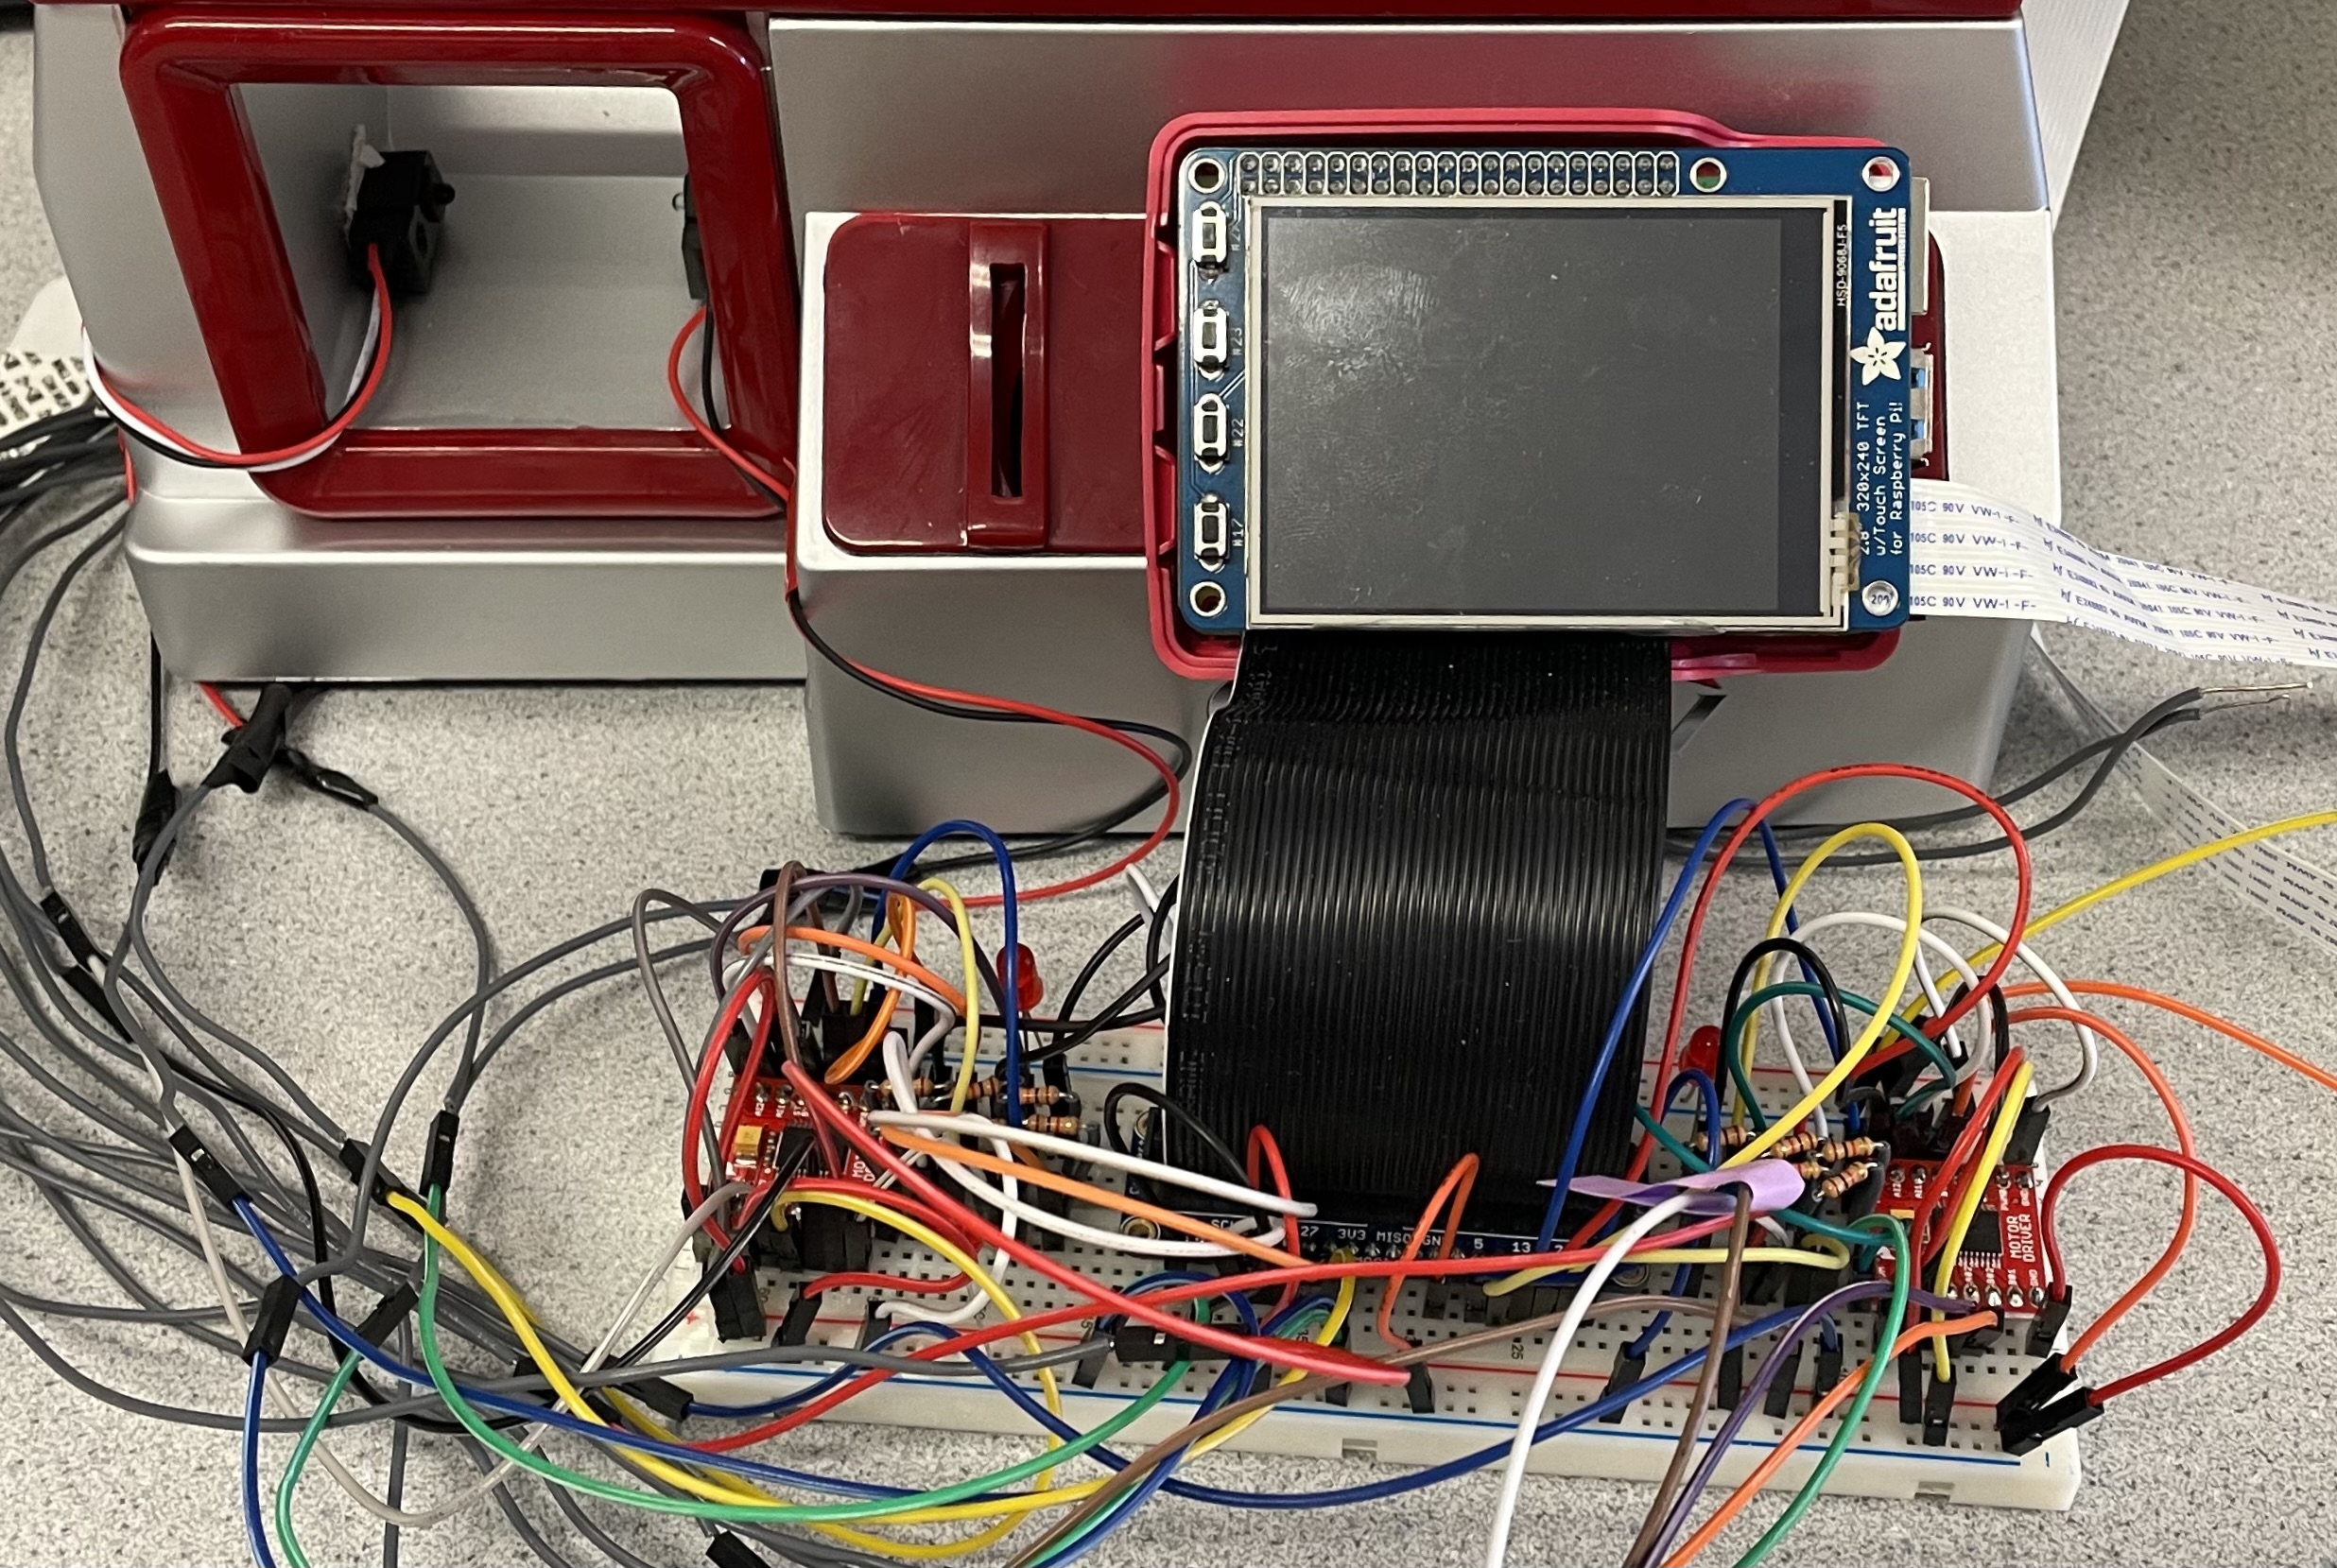
For simplicity of the project we started with a pre-built arcade claw machine so we had the motors and claw already set up. The hardware design started with the identification of the necessary components that need to be rewired from the current machine to the Raspberry Pi. The electrical components were separated into roughly 5 different sections which were the motors, limit switches, LEDs and music, battery pack, and coin slot. The LEDs and music were emitted from this project as they had no practical application to the goal of this project. We intially wanted to keep the coin slot to keep the arcade feel to the game, but it was not working properly when run in the full game so we elected to remove it and implement it into future work. However, we did keep the battery pack to keep the game feel and reduce the lab equiptment needed to run the machine. When rewiring the Raspberry Pi 4 we found that the original circuit board and the joysticks could be completely removed from the claw machine. This ultimately improved our design as the Raspberry Pi 4 and piTFT could be placed where those objects once were.
Motors and Limit Switches
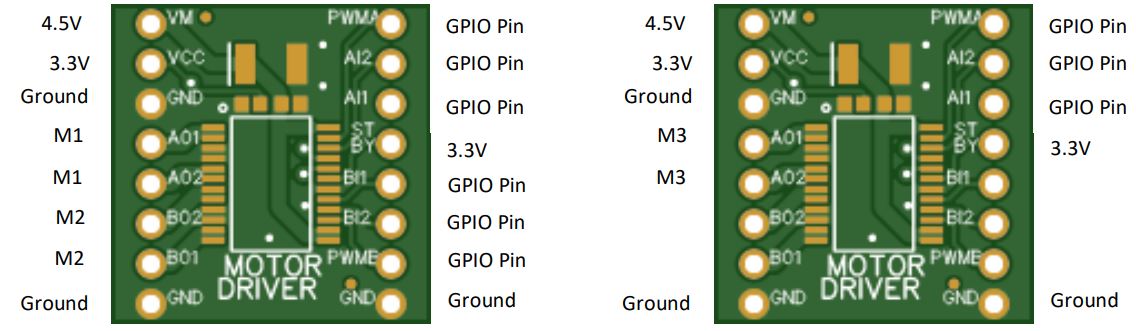
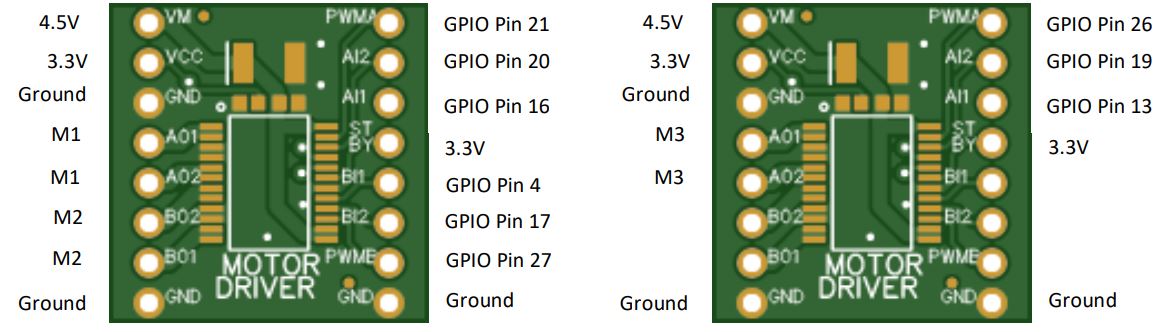
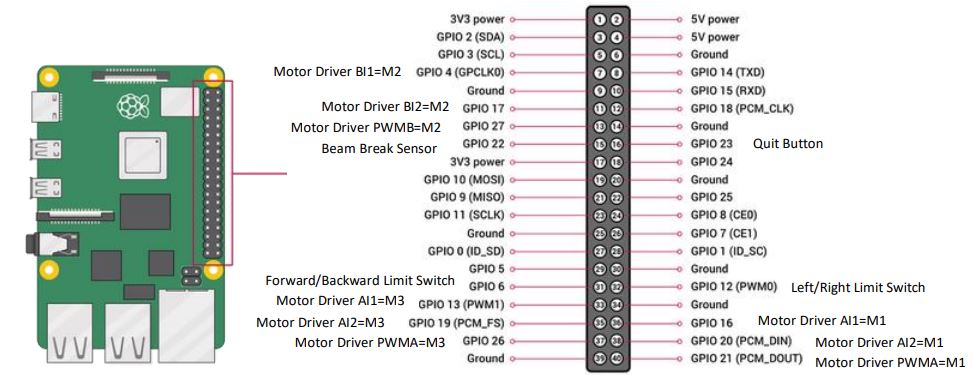
To simplify the wiring of the machine the four limit switch connections were reduced down to two. This was done by combining the left and right limit switches as they correlated to the same axis of movement. The same was done with the forward and backward limit switches as they too moved along the same axis. The motors were connected to motor drivers which are then connected to the GPIO pins so the hardware within the claw machine could communicate and be controlled by the Raspbery Pi. We initally used H-bridge motor controllers, but it was later discovered that they are not reliable and we switched to the motor controllers that were previously used in lab. We used 2 moter drivers because each one could control 2 motors and 3 motors were required for the claw machine.
GPIO Pins
We used at total of 12 GPIO pins which allowed us to incorporate a bailout button, beam breaker sensor, the motor controllers, and piTFT. Each motor requird 3 GPIO pins where two were connected to the inputs of the motor while the third was assigned to the PWM control of the specific mtor. One GPIO pin was then assigned to each of the remaining controls which were the left and right limit switch, forward and backward limit switch, and the beam break sensor.
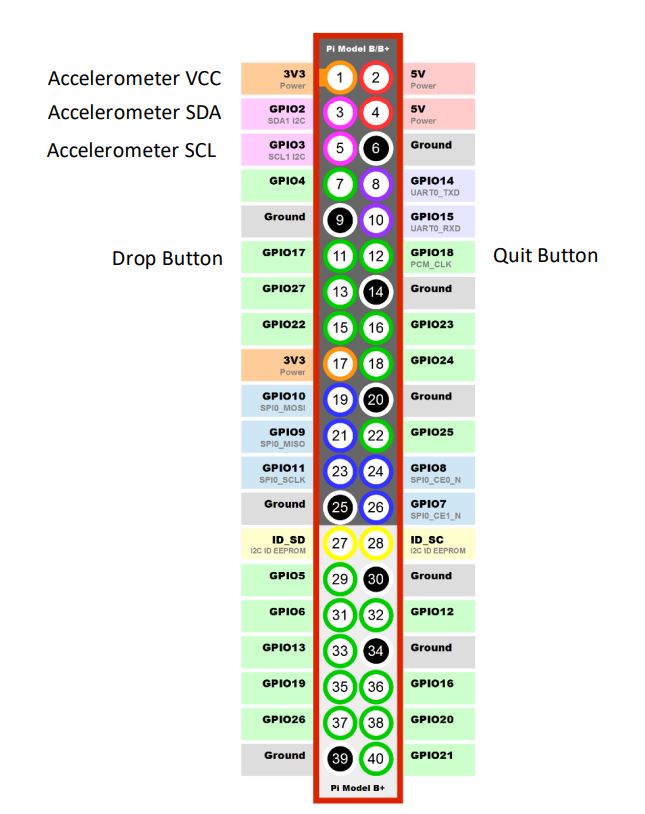
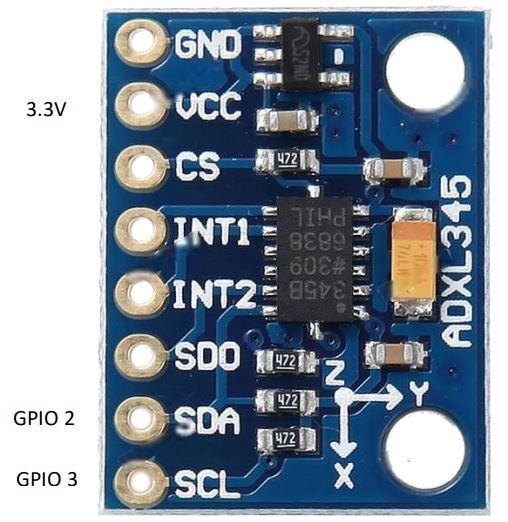
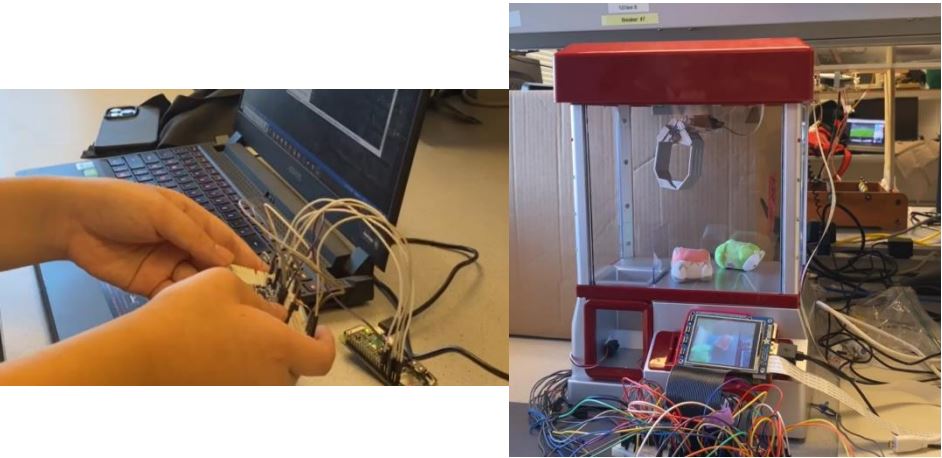
Raspberry Pi Zero and Accelerometer
To acheive acceleromter mode, we needed a device that could connect wirelessly to the Raspberry Pi 4. We could use our phone, but since we both had iPhones, we would have to program in iOS. We then decided to use the Raspberry Pi Zero connected to an acceleromter to mimic this. We added two buttons to this device to allow for a bailout button, and a drop button.
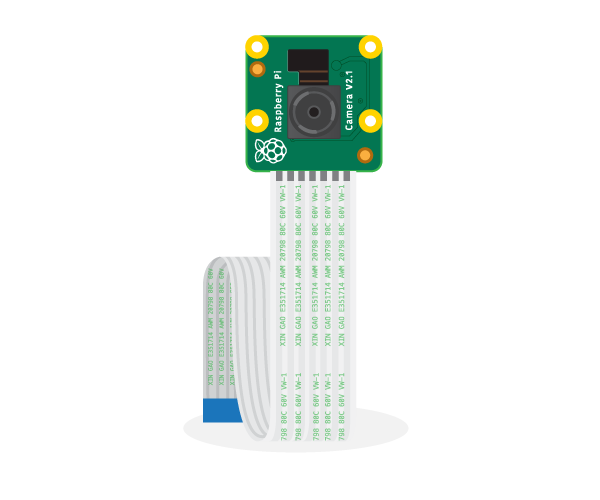
piCamera
The piCamera was used for both automatic mode and accelerometer mode and was attached to the camera slot on the Raspberry Pi 4. There was no real hardware need for the incorporation of the camera in our claw machine.
Software Design
Overview:
There are three main modes for this project: manual mode, automatic mode, and accelerator mode. A player can choose any of these modes using the piTFT once the player sets up the accelerator attachment. During these modes, the Raspberry Pi will detect if an item has dropped, where it will show a win screen. Otherwise, it will show a lose screen. Between each round, the claw machine will reset to its position above the drop bucket. Once the player is done, they can exit the game by a quit button from the idle screen.
Initialization:
As well, at the beginning we initialized all the GPIO pins for our program including the beam breaker, the physical quit button, the limit switches, and the motors. The beam breaker and physical quit button were set up to be GPIO in pins with a pull up resistor. The limit switches were set up to be GPIO in pins with a pull down resistor. With the beam breaker, we use an interrupt where when we detect a falling edge in the GPIO, we switch the item dropped variable to be set True as it means that something, probably an item, broke the beam. We reset the item dropped variable to be False at the beginning of the modes so that it would be accurate.
All the motor pins were set up to be GPIO out pins. Each of the three motors have two motor input pins and a PWM pin. The PWM for this claw machine is set up to have a 50% duty cycle at 50 Hz. The three motors for this claw machine moves the claw either forward/backward, left/right or up/down. As such, we represent each movement as a function that we can use within the program. We also have the function of stopping the motors as an individual or a total stop. Now with the function of the motor for the forward/backward and left/right, there’s also an additional mechanism where it wouldn’t output a high signal when the motors are hitting a particular limit switch. The program keeps track of which limit switch is being pushed as there are two different variables being tracked at a time, which motor is moving, and which limit is pushed. When the motors are moving, the moving variable is set to that movement. Then when a limit switch is pushed, the limit switch is set to the moving variable. Now the motors will stop moving in that direction. Since there are two sets of two limit switches, we keep 2 moving variables and limit switches representing forward/backward and left/right. The two drop command just set the motor downward for a set time, and then set the motor up for a set time. One is used to drop the item, while the other one is expected to pick up the item in the machine. We also had a reset command which we used at the beginning of the program due to not knowing which limit switch the claw machine was hitting when booting up. The reset command moves the motors forward/backward and left/right until the claw isn’t hitting any of the limit switches.
The initialization of the pygame program was similar to what was done in class. As well, there’s commands that check the position of where the person hit the touchscreen. If the person hits within the range that we expected for a button pushed, then return True from that function. Otherwise return False.
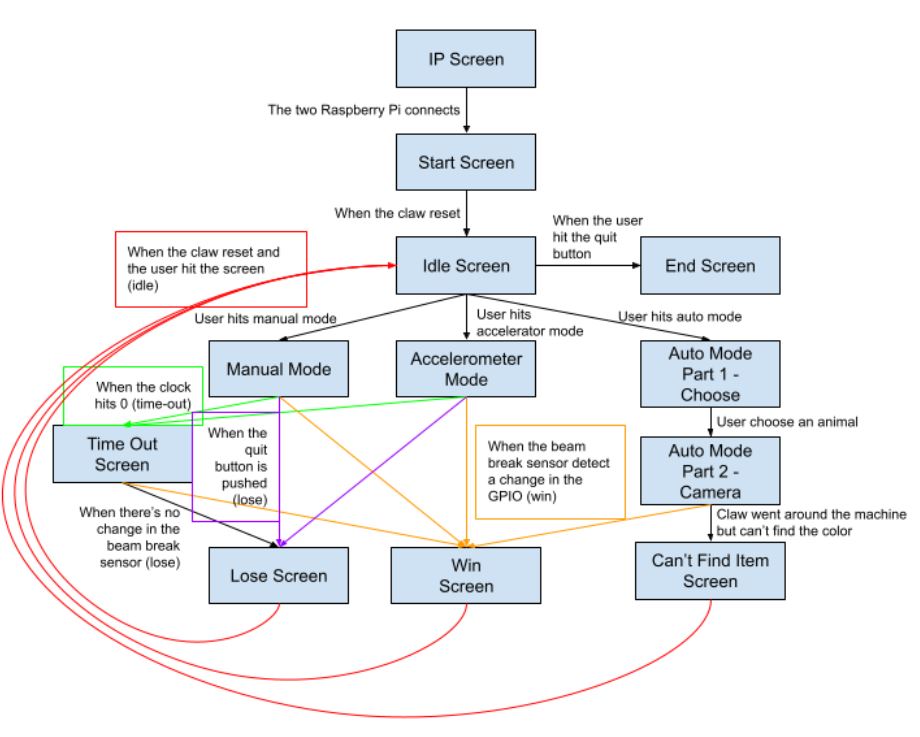
As shown in image 1, the pygame was set up with 12 different screens. Each screen has its own function for ease of changing the screen that is shown on the piTFT in the main function. Each screen function except for a few notable screens then returns a number which represents the next screen that we want to use when something has changed in the program. The diagram shows the screens and what screens they switch to depending on what condition has been meant.
IP Screen:
Beforehand, we check the Raspberry Pi public IPv4 address for the socketing. Afterward, we show that IP address on the screen, and then bind to that IP address and port as a server. The client is a Raspberry Pi Zero with an accelerator and two buttons hooked up to it. The Raspberry Pi Zero connects to the IP Address and port of the main Raspberry Pi. The main Raspberry Pi accepts the socket, and then keeps that connection open until we use the accelerator in accelerator mode. Then the screen moves to the start screen.
Start Screen:
The start screen only shows “Please Wait” on the screen while the motors are resetting to the start position. It uses the motor reset command, and then moves the motor left and down until the left and backward limit switches are being pushed. Afterward it gracefully exits the function to the idle screen.
Idle Screen:
With this screen, we show the three modes that a person can choose: manual mode, automatic mode, and accelerometer mode. As well, we have a quit button which a person can hit to move the end screen. The idle screen moves to their respective screen when a person hits one of the modes.
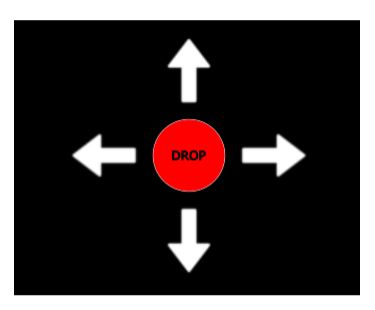
Manual Screen:
This screen shows something like image 2. When a person pushes on one of the arrows, the pygame detects that button has been pressed and moves the motor in that direction. When a person lets go of the arrow, the pygame also detects that, and stops the motor. When the drop button is pressed, then the drop command happens. When the beam breaker detects that an item has dropped, then we move to the congratulation screen. Otherwise when the program times out at 2 minutes, then we move into the time-out screen. There’s also a quit button which takes the person to the you lose screen.
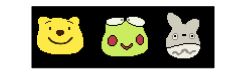
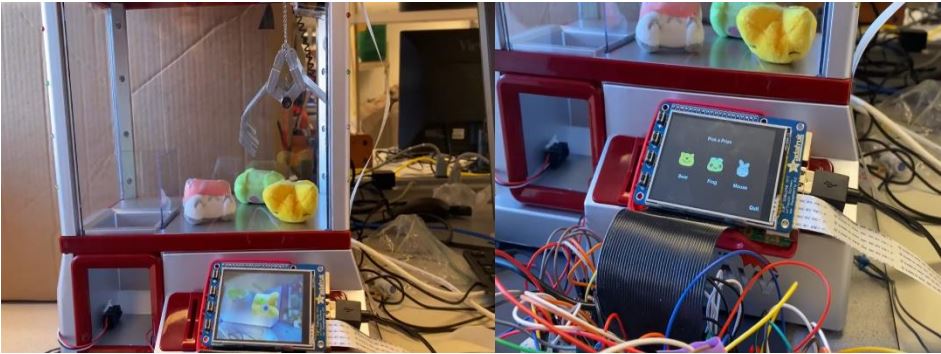
Auto Mode-Choose:
Automatic Mode is split into 2 separate screens, the choosing screen and the camera screen. There are three different animals in the claw machine that someone can choose. There’s the bear, the frog, and the mouse as shown in image 3. When a person picks one of the animals, the program saves which animal was chosen, and moves into the auto mode part 2 - camera.
Auto Mode-Animal:


At the beginning of this mode, the camera is initialized. We are using the PiVideoStream Library to help with the camera functionality of this program. The camera will first take a picture. This picture is in BGR, so it switches to RGB for pygame. Then we resized the frame and inverted it. At last we blit the screen and flip it to show on the piTFT.
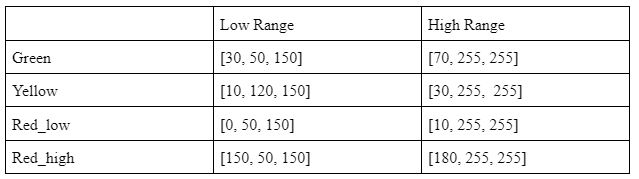
The main bulk of this screen is the two loops that the program goes through. The bigger loop basically keeps trying the smaller loop until the program either gets the animal or can’t find the animal in the machine. The smaller loop is basically the algorithm that the machine uses to find the animal. First the image is taken from the Pi Camera. Then the image is switched from BGR to HSV and compared to three different ranges of hsv values that was found previously of green for the frog, yellow for the bear, and red for the mouse. The program makes a mask with those three different ranges, and checks how many pixels are in the mask. If there’s enough pixels, we say that we found the color, and keep track of the average x, y coordinates of all the pixels. Now it’s not enough that we found the color, we need to find the color 5 times in the loop before we can consider that we found the animal. This is to hopefully reduce the noise that we sometimes detect a color when the animal isn’t really there. When we consider that we found the animal, then we display the average x, y coordinates of the animal. Hopefully the x, y coordinates are in the middle of the animal. As well, when we detect the animal that the player wants, we set the searching variable to False as we found the animal. Afterward, the motor will try to move so that the x,y coordinates are in the center of the screen. There’s a function that will move the motor forward/backward, and left/right depending on the x,y coordinates. As well, it checks if the x,y coordinates are either in the center of the screen, or the motors are hitting the limit switches that prevent it from moving. We return True when the x,y coordinates are in the center of the screen which connects to the last part variable. The next step is to move the motor right for a couple of seconds. This is due to the camera is right of the claw, and therefore the center of the camera is off-centered from the claw. Then we use the drop command to try to pick up the item. Then we flip the finished variable to True. The last part uses the motor reset command, and then moves the motor left and down until the left and backward limit switches are being pushed. Once there, it does the drop lite command. If the item is dropped, then we move to the congratulation screen. Otherwise the big loop makes it so we reset this whole process again. However, if the color isn’t picked up, then the claw will go around in a circle around the machine in search of the color. It first goes forward, then right, then backward, and last left. If it went around the machine without detecting the color once, then once it hits the limit switch, it will switch to the can’t find item screen.
Accelerometer Mode:
This mode also uses a camera which was explained in the previously mentioned automatic mode. As well, this mode uses the connection that was saved in the ip screen. We first read from the buffer that is taken from the Raspberry Pi Zero. The Raspberry Pi Zero accelerator gives x, y, and z coordinates in how the board is tilted. The x coordinate corresponds to the forward/backward direction, and the y coordinate corresponds to the left/right direction. As such, every 0.025 sleep, it checks the x and y coordinates and sends them as commands in the buffer. As well, it checks if the buttons are being pressed, and sends the commands in the buffer as well. The buffer is then received by the main Raspberry Pi which splits the buffer into the separate commands. If it finds the quit command, then we switch to the you lose screen. Otherwise it takes the last word in the buffer and performs the action that is given. The drop command drops the claw, and the flat commands stop all the motor entirely. Again, like in manual mode, when the beam breaker detects that an item has dropped, then we move to the congratulation screen. Otherwise when the program times out at 2 minutes, then we move into the time-out screen.
Time-Out Screen:
The Time-Out Screen shows the word “Time-Out” on the screen. It also does the drop lite command to drop the animal if there’s an animal in the claw. If the animal drops into the chute, then move to the congratulation screen. Otherwise, move to the you lose screen.
Lose Screen:
The lose screen shows the words “Sorry, You Lose” on the screen. Then, it uses the motor reset command, and then moves the motor left and down until the left and backward limit switches are being pushed. Afterward the words of “please touch the screen to continue” pops up. Once the player pushes the screen, then the screen switches back to the idle screen.
Win Screen:
The win screen shows the words “Congratulations, You Win” on the screen. Then, it uses the motor reset command, and then moves the motor left and down until the left and backward limit switches are being pushed. Afterward the words of “please touch the screen to continue” pops up. Once the player pushes the screen, then the screen switches back to the idle screen.
Can't Find Item Screen:
The can’t find item screen shows the words "Sorry, the object isn't in the Claw Machine" on the screen. Then, it uses the motor reset command, and then moves the motor left and down until the left and backward limit switches are being pushed. Afterward the words of “please touch the screen to continue” pops up. Once the player pushes the screen, then the screen switches back to the idle screen.
End Screen:
The end screen shows the words "Thank you for playing" on the screen. Then, it uses the motor reset command, and then moves the motor left and down until the left and backward limit switches are being pushed. Afterward the words of “Please touch the screen to end” pops up. Once the player pushes the screen, then the whole program just ends.
Testing
Software:
We had some problems with some of the software portions for this final project. The big one was dealing with computer vision. We decided to use the frog, the bear, and the mouse for our project. The frog and the bear were also in the previous group work, and as such we first used their code and previous numbers to detect the colors. The mouse however was the same color as the floor of the claw machine. At first, we decided to use a circle detection program. However, that proved to be faulty as there were a lot of false positives if the circle parameter is too lax, but it wouldn’t pick up the mouse if it was too strict. As such, we decided to add color to the mouse to make it easier to be picked up by the camera. Afterward going through some colors, we landed on red, as that was the easiest color to split apart from the gray bottom. Then we noticed that the ranges that the previous group did provided really inaccurate data. The average x,y coordinates would be way off. Creating the image from the mask shows us that this is due to it picking up a lot of random noise. As such, we decided to scrap the previous group ranges, and make our own. HSV means hue, saturation, and value. Hue is the actual color, saturation is the number of gray pixels in the pixel, and value is the intensity of the color. Playing around with a script that lets you modify the minimum and maximum values of the hsv range, we noticed that we want the saturation value to be above 50 and the value to be above 150 due to the ground also being picked up sometimes. We think this is due to the fact that the ground and window is a bit reflected and so it’s picking up the reflective color. However, then we need to ensure that the claw machine is in a bright area, so that color detection works correctly. In addition, red is actually at the edge of the color spectrum, so there’s a need for two different ranges for the red to ensure it picks it up correctly. We just combine the two masks afterward.

Another issue we dealt with is the claw being in the way of the Pi Camera. First the up/down motor sometimes has different speeds of dropping. We actually had to increase the sleep time from 5 seconds to now around 8 seconds for the drop. So sometimes, when the motor is going up, it won't reach the point that we want, and start blocking the camera. This is problematic as the color detection part we try to detect a certain number of pixels that is that color before deciding if that is the animal. If half of the screen is being blocked, then the number of pixels that is that color will decrease which can cause the algorithm to bounce being found and not found. There wasn’t really a way to fix the up/down motor problem, so we first lowered the number of pixels that it needed to detect to decide if it saw the animal. However, if that number is too low, then noise gets in the way. As such, we had to expand the radius that we consider the center of the screen. As well, since sometime it would detect that the center of the x,y coordinate is at an edge, which means that the limit switches are being hit, so we had to add that into the algorithm where it would ignore that side if that limit switch is being hit.
Another big one was dealing with the limit switches. At first, we tried to get the limit switch to be part of an interrupt. However, when doing the GPIO stuff, it doesn’t like when there’s a falling edge and rising edge for the GPIO. There is one for both, but it’s a bit funky. As such, we decided to go the old fashion route where whenever we loop through a program, we also check if the limit switches are being hit. However, that means we have to be careful to set the limit switch variable whenever we are using a motor command not in the loop. An example is the motor reset command where it tries to get off the limit switches in general. At the end of the program, it needed to change the limit switch variable to none since we know at that point it’s not hitting any limit switches. Also, to ensure that we aren’t hitting a limit switch, we actually needed to add a while loop to check if we are hitting a limit switch, and increase the sleep time between the motor change if it is still hitting the limit switch. Another one is when we move the motor left and backward to the bucket. We first use the stop motor command for that direction when we hit the limit switch. Afterward, when both switches are being pushed, we set the limit switch variable to left and backward.
We didn’t really have a problem with dealing with the screens, though the way we check that it looks ok is using a test_screen program. We also realized that python doesn’t like if you call functions with the same name even if they have different numbers of arguments.
Hardware:
Much of the hardware testing was dependant of the software testing. there were no major problems with the hardware as it all worked as expected when combined with the software. To ensure that everything was working correctly, LEDS were added to the motor circuit to ensure that there were no problems with the connection.
One problem that we ran into was the placement of the beam breaker sensor so that the two sides were even, but also was in a good place for when the prizes dropped. Having it higher up would allow for everything that fell through the prize drop to be picked up. But the other problem that arose from that was the prizes not being small enough to fit with the sensor that high. To improve this it was thought to make them smaller, but they still would not fit. This caused us to move the sensor again, to the bottom, but not so far back that the prizes would fall over the sensor. Sometimes the prizes would jump out of the drop, but that could be solved by implementing a door in the future. So it was found that the third placement of the sensor was the most reliable to pick up a prize falling.
We learned that the limit switches functioned as simple switches, so to determine the necessary code we had to determine if the switches were step up or pull down to ensure we would not harm the switches. This was done using a voltmeter to determine when the switch was in the open and close position.
Results
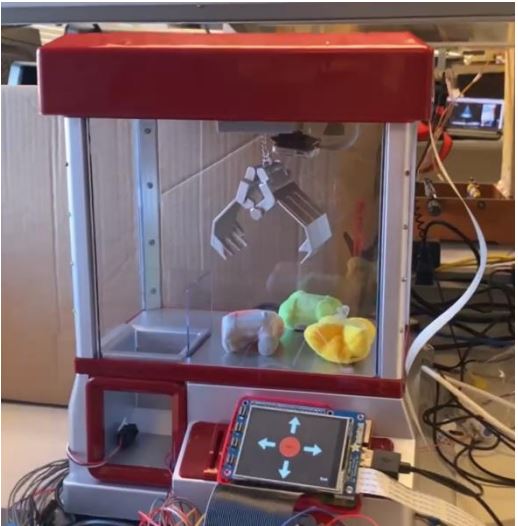
In manual mode the piTFT screen replaces the traditional joysticks that are found on a claw machine. When the user presses the arrows the claw moves in that direction. The user will then press the drop button when they feel they are in the correct location to pick up the prize. The user also has the guide the claw to the dropbox to drop the prize.
In automatic mode the user will choose from the prizes within the claw machine. This will prompt the piCamera to initiate and start scanning the machine for that specified item. Once it locates the item the claw will adjust to get under the item and pick it up. It will then move to the drop box and release the item. Throughout the scanning the user is also able to see the video picked up on the piCamera on the piTFT screen.
In accelerometer mode he user controls the claw machine with the accelerometer and Raspberry Pi Zero. The camera is also initiated in this mode which allows for the the user to choose to look at the claw machine or thorugh the camera. When the user is ready to drop the claw, they are to press the button on the side of the accelerometer. The would then guide the claw to the drop box using the accelerometer and Raspberry Pi Zero.

The first picture is the start screen where the user chooses which mode they want to play. Once one is selected it will prompt the claw machine to start that mode for the user. The second image shows what the screen will show when the beam break sensor senses that something is blocking it.
Conclusion
The project did get the result that we wanted. All the modes were set up correctly so that a player can use them. While we were pleased with the manual and accelerometer mode, we still wanted to work on the automatic mode to make it a bit better. The circle detection didn’t really work due to the noise that happened, and for the color detection, we had to choose the right color that didn’t interfere with any color of the machine such as gray. In future work, we plan to improve the automatic mode so it’s up to the standard that we were expecting.
Future Work
While we are proud of our progress with the claw machine, there were some things that needed to be cut out. The main thing is that we had to cut the coin part of the machine. The machine has a coin slot which is attached to a button. We did connect that button to a GPIO pin. However, that button is being wonky, where it would fire at weird times. As such, the coin that we would get would be like 15 by the time we get to the idle screen. Since it was so close to the end, we decided to just cut it since it seems like more of a hardware problem than a software problem. As well, the drop command is still kind of inaccurate due to the fact that we use a sleep function instead of a feedback mechanism. We were thinking maybe using some sort of sensor at the end of the claw that detects when it reaches the ground. Then inside the claw, we also wanted a way to detect if there’s something inside the claw to make the automatic mode faster as instead of going to the whole process each time, it can detect that it didn’t pick it up and retry at that position.
Another thing that we want to work on more is the automatic mode with the color detection and the algorithm to pick up the animals. The algorithm that we use is kind of primitive, and is susceptible to noise. As well, the algorithm doesn’t really save the position of the color x,y coordinates once it finds it. Therefore you might get a problem where it moves in between searching and not searching mode. As such, it might be nice to expand the algorithm to make it less susceptible to noise, and remember coordinates of the item when it finds it. Maybe using the circle mode to ensure that the x,y coordinates are within the circle to make it less susceptible. Maybe have a grid like pattern at the bottom of the machine so it can remember the x,y coordinates.
We also maybe wanted a door at the end of the chute so that the animals will always break the beam sensor, and not just bounce out. As well, we wanted to add some sound and confetti for the congratulation screen so that the person feels like they accomplished something once they get the item.
Work Distribution
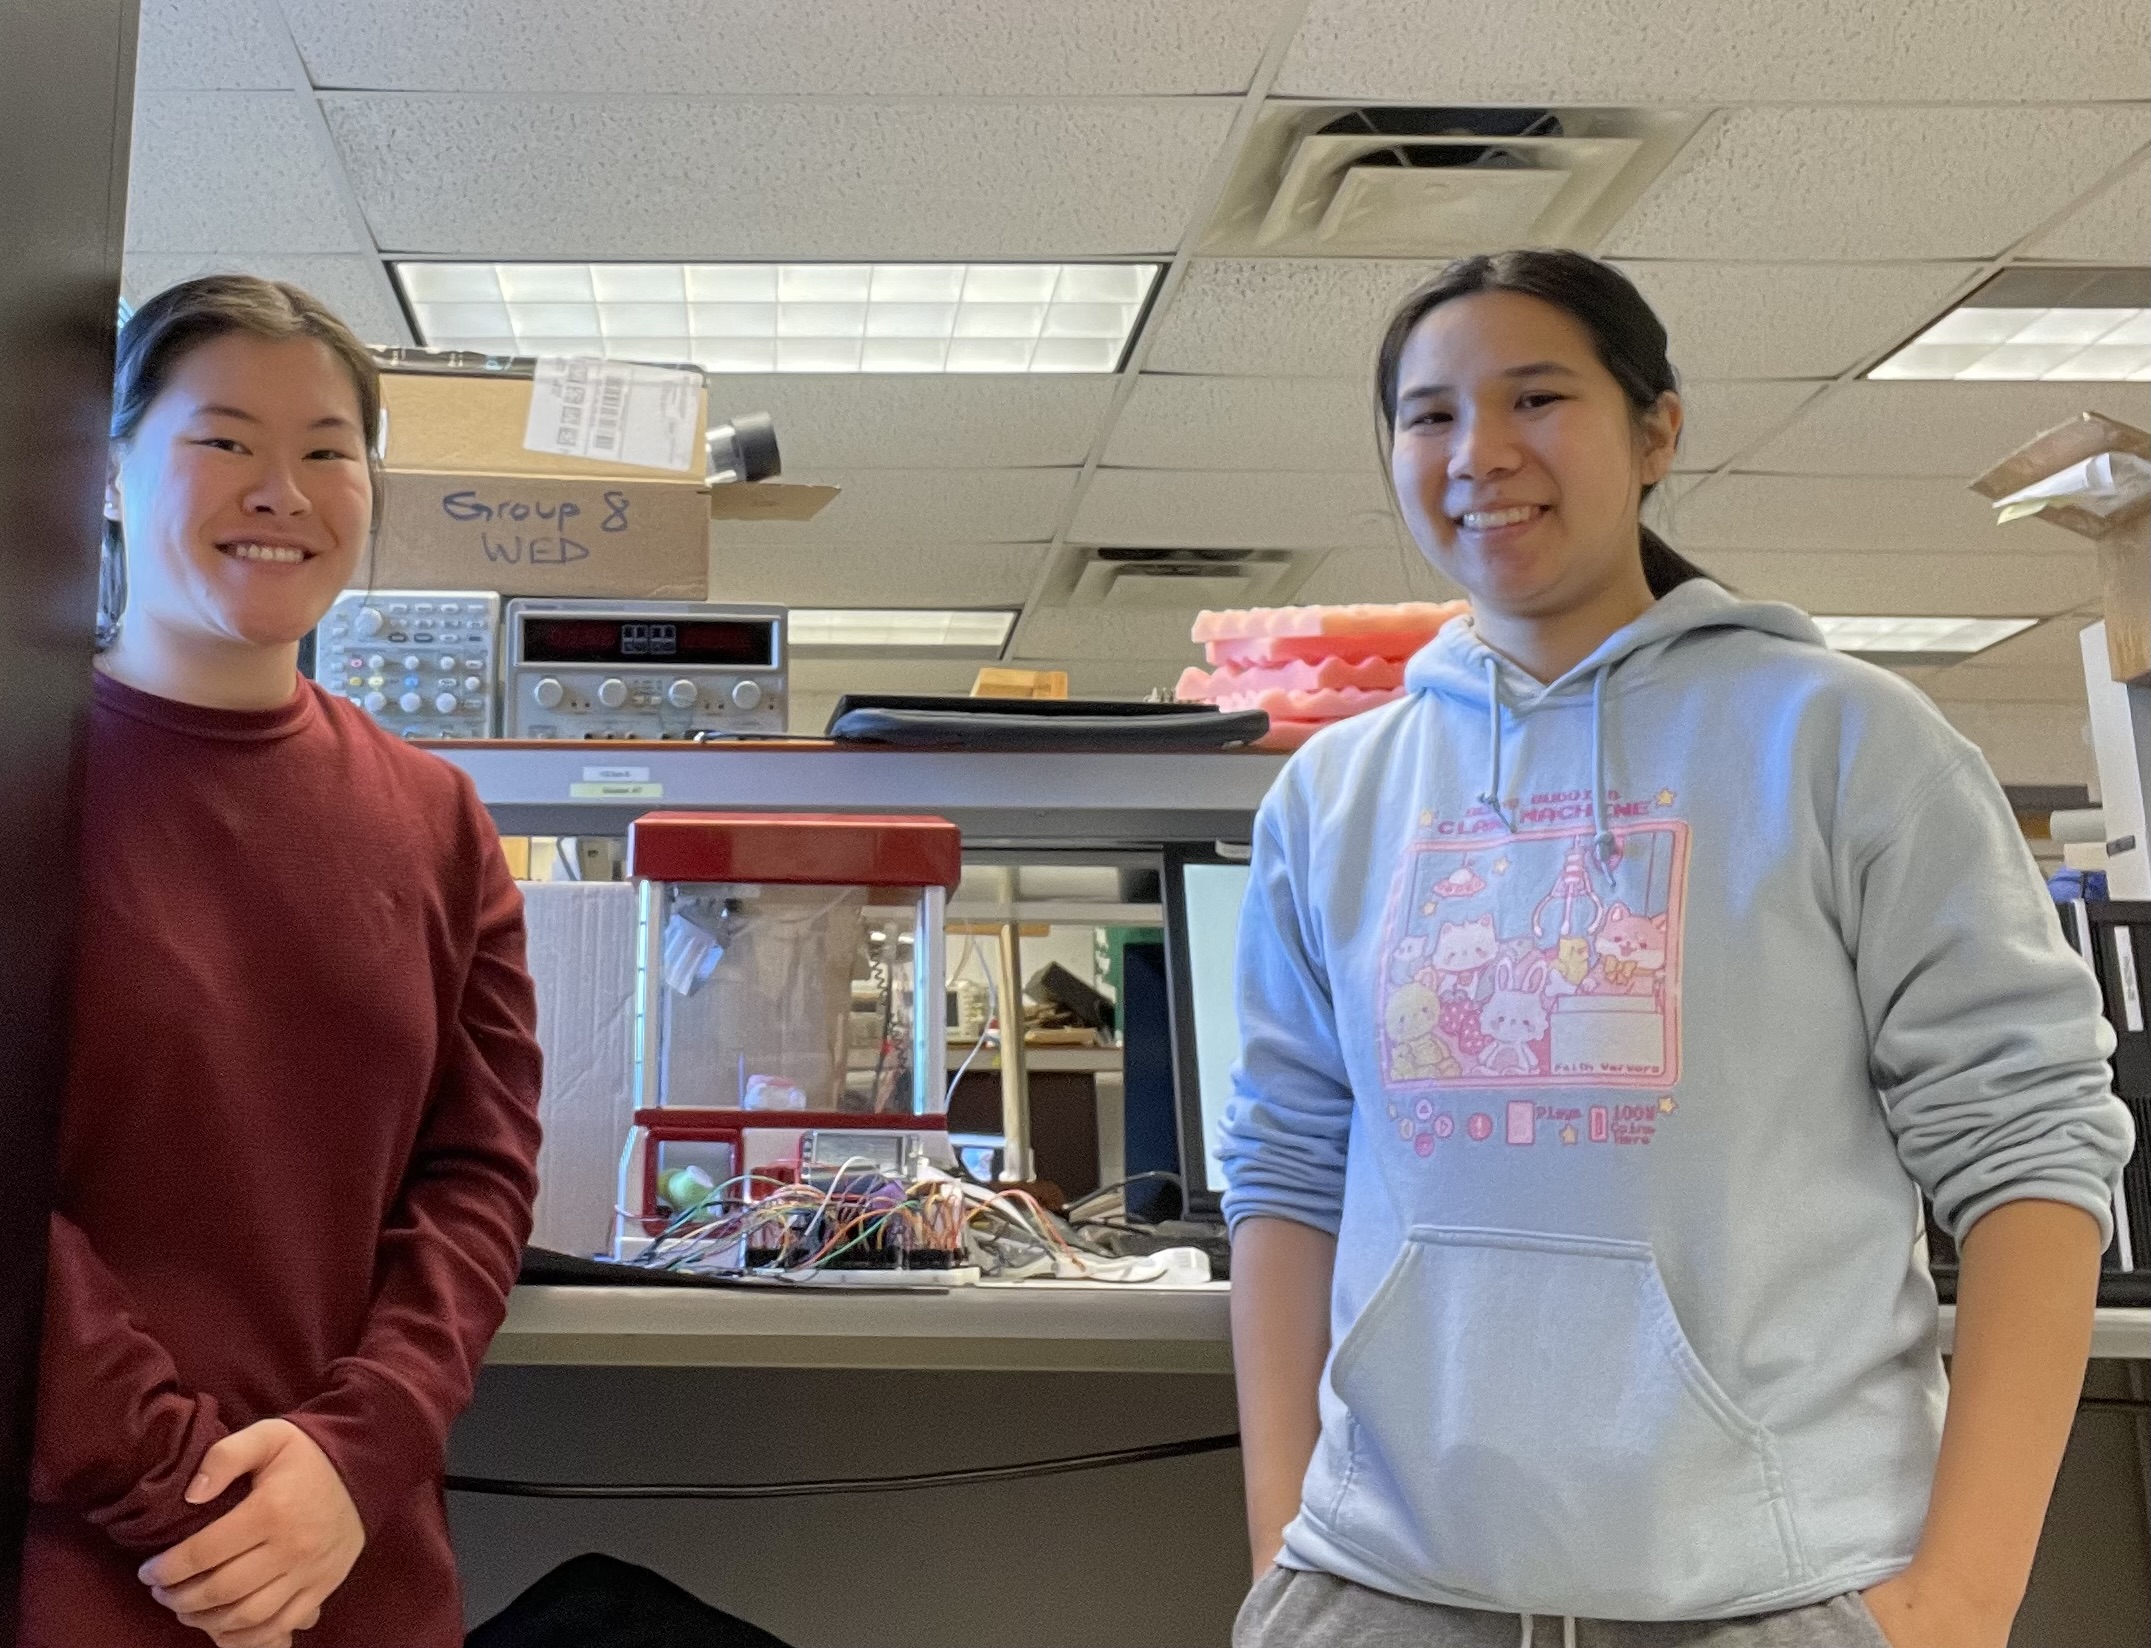
Project group picture

Victoria Hathaway
vh226@cornell.edu
Hardware Design

Lily Yu
gly6@cornell.edu
Software Design
Parts List
- Raspberry Pi 4 $35.00
- Raspberry Pi Camera V2 $25.00
- The Claw $48.95
- D Batteries $14.99
- Dual Motor Driver $9.95 x2
- LEDs, Resistors and Wires - Provided in lab
Total: $143.84
References
The Claw Pi MachineColor Detection
PiArcade
Accelerometer Picture
Pi Zero Picture
Pi 4 Picture
Motor Driver Picture
Lab 3 Fall 2022
piCamera
Code Appendix
###############################################################################
# screen.py
#
# Authors: Victoria Hathaway (vh226)
# Lily Yu (gly6)
#
# Date: December 12th 2022
#
# Description:
# This scirpt is the main function of the program
# Has multiple different screens for manual, automatic, and acclerator mode
###############################################################################
import os
import sys, pygame
import subprocess
import RPi.GPIO as GPIO
import time
import numpy as np
import random
import cv2
from imutils.video import WebcamVideoStream
from imutils.video.pivideostream import PiVideoStream
import threading
import imutils
import socket
GPIO.setmode(GPIO.BCM)
#setup for the phyiscal button
button_1 = 23
GPIO.setup(button_1, GPIO.IN, pull_up_down=GPIO.PUD_UP)
#setup for the bitstream sensor
bitstream_switch = 22
GPIO.setup(bitstream_switch, GPIO.IN, pull_up_down=GPIO.PUD_UP)
item_dropped = 0
def dropped_callback(channel):
global item_dropped
item_dropped = 1
GPIO.add_event_detect(bitstream_switch, GPIO.FALLING, callback=dropped_callback, bouncetime=300)
#setup for the motor GPIO pins
#forward/backward motor
motor1_1= 20
motor1_2 = 16
PWMA = 21
#left/right motor
motor2_1 = 4
motor2_2 = 17
PWMB = 27
#up/down motor
motor3_1 = 19
motor3_2 = 13
PWMC = 26
GPIO.setup(motor1_1, GPIO.OUT)
GPIO.setup(motor1_2, GPIO.OUT)
GPIO.setup(motor2_1, GPIO.OUT)
GPIO.setup(motor2_2, GPIO.OUT)
GPIO.setup(motor3_1, GPIO.OUT)
GPIO.setup(motor3_2, GPIO.OUT)
GPIO.setup(PWMA, GPIO.OUT)
GPIO.setup(PWMB, GPIO.OUT)
GPIO.setup(PWMC, GPIO.OUT)
# doing a 50% PWM at 50 Hz
full_frequency = 50
half_dc = 50
motor_a_pwm = GPIO.PWM(PWMA, full_frequency)
motor_b_pwm = GPIO.PWM(PWMB, full_frequency)
motor_c_pwm = GPIO.PWM(PWMC, full_frequency)
motor_a_pwm.start(half_dc) #forward/backward
motor_b_pwm.start(half_dc) #left/right
motor_c_pwm.start(half_dc) #up/down
#setup for the limit switches
lr_limit_switch = 12
fb_limit_switch = 6
GPIO.setup(lr_limit_switch, GPIO.IN, pull_up_down=GPIO.PUD_DOWN)
GPIO.setup(fb_limit_switch, GPIO.IN, pull_up_down=GPIO.PUD_DOWN)
# keep track of which way the motor are moving
moving_lr = 'none'
moving_fb = 'none'
# keep track of which bumper are being hit at this point
lr_side = 'none'
fb_side = 'none'
def motor_forward():
global moving_fb
moving_fb = 'forward'
if (fb_side != 'forward'):
GPIO.output(motor1_1, GPIO.HIGH)
GPIO.output(motor1_2, GPIO.LOW)
def motor_backward():
global moving_fb
moving_fb = 'backward'
if (fb_side != 'backward'):
GPIO.output(motor1_1, GPIO.LOW)
GPIO.output(motor1_2, GPIO.HIGH)
def motor_stop_fb():
GPIO.output(motor1_1, GPIO.LOW)
GPIO.output(motor1_2, GPIO.LOW)
def motor_left():
global moving_lr
moving_lr = 'left'
if (lr_side != 'left'):
GPIO.output(motor2_1, GPIO.HIGH)
GPIO.output(motor2_2, GPIO.LOW)
def motor_right():
global moving_lr
moving_lr = 'right'
if (lr_side != 'right'):
GPIO.output(motor2_1, GPIO.LOW)
GPIO.output(motor2_2, GPIO.HIGH)
def motor_stop_lr():
GPIO.output(motor2_1, GPIO.LOW)
GPIO.output(motor2_2, GPIO.LOW)
def motor_up():
GPIO.output(motor3_1, GPIO.HIGH)
GPIO.output(motor3_2, GPIO.LOW)
def motor_down():
GPIO.output(motor3_1, GPIO.LOW)
GPIO.output(motor3_2, GPIO.HIGH)
def motor_stop_ud():
GPIO.output(motor3_1, GPIO.LOW)
GPIO.output(motor3_2, GPIO.LOW)
def motor_stop():
GPIO.output(motor1_1, GPIO.LOW)
GPIO.output(motor1_2, GPIO.LOW)
GPIO.output(motor2_1, GPIO.LOW)
GPIO.output(motor2_2, GPIO.LOW)
GPIO.output(motor3_1, GPIO.LOW)
GPIO.output(motor3_2, GPIO.LOW)
# for just opening the claw
def drop_lite_command():
global item_dropped
item_dropped = 0
motor_down()
time.sleep(2)
motor_up()
time.sleep(2.5)
motor_stop_ud()
# dropping down to the bottom of the machine
def drop_command():
global item_dropped
item_dropped = 0
motor_stop()
motor_down()
time.sleep(8)
motor_up()
time.sleep(8.5)
motor_stop_ud()
#used to reset the claw machine
def motor_start():
global lr_side
global fb_side
sleep_time = 1
while (not GPIO.input(fb_limit_switch)):
if (not GPIO.input(fb_limit_switch)):
motor_forward()
time.sleep(sleep_time)
if (not GPIO.input(fb_limit_switch)):
motor_backward()
time.sleep(sleep_time)
sleep_time = sleep_time + 0.5
while(not GPIO.input(lr_limit_switch)):
if (not GPIO.input(lr_limit_switch)):
motor_right()
time.sleep(sleep_time)
if (not GPIO.input(lr_limit_switch)):
motor_left()
time.sleep(sleep_time)
sleep_time = sleep_time + 0.5
motor_stop()
lr_side = 'none'
fb_side = 'none'
# use for the screen
# use for when the button is a square
def check_pos (pos, but_pos ,ran):
if (width - pos[0] > but_pos[0]-ran and width - pos[0] < but_pos[0]+ran and height - pos[1] > but_pos[1]-ran and height - pos[1] < but_pos[1]+ran):
return True
return False
# use for when the button is a rectangle
def check_pos_nc (pos, but_pos, x_ran, y_ran):
if (width - pos[0] > but_pos[0]-x_ran and width -pos[0] < but_pos[0]+x_ran and height - pos[1] > but_pos[1]-y_ran and height - pos[1] < but_pos[1]+y_ran):
return True
return False
# use for the auto mode
low_end_x = 90
high_end_x = 150
low_end_y = 150
high_end_y = 210
# check to see if the item is in the center of the screen or it's hitting a bumper at this time
def range_check_bumper(x,y):
if (x > low_end_x or lr_side == 'left'):
if (x < high_end_x or lr_side == 'right'):
if (y > low_end_y or fb_side == 'backward'):
if (y < high_end_y or fb_side == 'forward'):
return True
return False
# use to move towards item at hand
def range_check_motor(x, y):
print(str(x) + " " + str(y))
if (range_check_bumper(x,y)):
motor_stop()
return True
if (x < low_end_x):
motor_left()
elif (x > high_end_x):
motor_right()
else:
motor_stop_lr()
if (y < low_end_y):
motor_backward()
elif (y > high_end_y):
motor_forward()
else:
motor_stop_fb()
return False
# setup the pygame software
os.putenv('SDL_VIDEODRIVER', 'fbcon') # Display on piTFT
os.putenv('SDL_FBDEV', '/dev/fb0') #
os.putenv('SDL_MOUSEDRV', 'TSLIB') # Track mouse clicks on piTFT
os.putenv('SDL_MOUSEDEV', '/dev/input/touchscreen')
pygame.init()
size = width, height = 320, 240 #size of the screen
black = 0, 0, 0 #RGB for black
white = 255, 255, 255 #RGB for white
screen = pygame.display.set_mode(size)
pygame.mouse.set_visible(False) #turn off the mouse
quit_coor = (300, 220) #used for multiple screen
animal_text = 'none' #use for auto mode
# Idle Screen
def screen_2():
global pygame
global item_dropped
temp_text = ""
my_font = pygame.font.Font(None, 20)
manual_coor = (160, 60)
auto_coor = (160, 110)
accel_coor = (160, 160)
my_buttons = {'Manual Mode':(manual_coor), 'Automatic Mode': (auto_coor), 'Accelerometer Mode': (accel_coor), 'Quit':(quit_coor)}
screen.fill(black) # Erase the Work space
for my_text, text_pos in my_buttons.items():
text_surface = my_font.render(my_text, True, white)
rect = text_surface.get_rect(center=text_pos)
screen.blit(text_surface, rect)
pygame.display.flip()
going = True
while (GPIO.input(button_1) and going):
item_dropped = 0
# physical button quit
if (not GPIO.input(button_1)):
going = False
temp_text = "Quit"
for event in pygame.event.get():
if(event.type == pygame.MOUSEBUTTONDOWN):
pos = pygame.mouse.get_pos()
# screen button quit
if (check_pos(pos, quit_coor, 20)):
going = False
temp_text = "Quit"
# manual mode
if (check_pos_nc(pos, manual_coor, 60, 20)):
going = False
temp_text = "3"
# auto mode
if (check_pos_nc(pos, auto_coor, 60, 20)):
going = False
temp_text = "4"
# accerlerator mode
if (check_pos_nc(pos, accel_coor, 70, 20)):
going = False
temp_text = "6"
#update screen
screen.fill(black)
for my_text, text_pos in my_buttons.items():
text_surface = my_font.render(my_text, True, white)
rect = text_surface.get_rect(center=text_pos)
screen.blit(text_surface, rect)
pygame.display.flip()
return temp_text
# Manual Mode Screen
def screen_3():
global pygame
global lr_side
global fb_side
temp_text = ""
my_font = pygame.font.Font(None, 20)
my_buttons = {'Exit':(300,220)}
screen.fill(black) # Erase the Work space
for my_text, text_pos in my_buttons.items():
text_surface = my_font.render(my_text, True, white)
rect = text_surface.get_rect(center=text_pos)
screen.blit(text_surface, rect)
drop_button = pygame.image.load("Drop_Button_1.png")
drop_button_rect = drop_button.get_rect()
screen.blit(drop_button, drop_button_rect)
drop_button_coor = (160, 120)
up_arrow_coor = (160, 30)
down_arrow_coor = (160, 210)
left_arrow_coor = (70, 120)
right_arrow_coor = (250, 120)
time_out = 120
pygame.display.flip()
going = True
start_screen = time.time()
while (GPIO.input(button_1) and going):
#physical quit button
if (not GPIO.input(button_1)):
going = False
temp_text = "Quit"
# checking if one of limit switch are being hit
if (not GPIO.input(lr_limit_switch)):
if (lr_side == 'none'):
motor_stop_lr()
lr_side = moving_lr
else:
lr_side = 'none'
if (not GPIO.input(fb_limit_switch)):
if (fb_side == 'none'):
motor_stop_fb()
fb_side = moving_fb
else:
fb_side = 'none'
#switch to a different screen when it time out
if (time.time() - start_screen > time_out):
going = False
temp_text = "11" # move to the time-out screen
# switch to a different screen when it detect that a item has dropped
if (item_dropped == 1):
going = False
temp_text = '8' # move to the congratulations screen
for event in pygame.event.get():
if(event.type == pygame.MOUSEBUTTONDOWN):
# check if screen is being pushed and move the motor
pos = pygame.mouse.get_pos()
# screen button quit
if (check_pos(pos, quit_coor, 20)):
going = False
temp_text = "7" # go to the you lose screen
if (check_pos(pos, drop_button_coor, 40)):
drop_command()
if (check_pos_nc (pos, up_arrow_coor, 30, 40)):
motor_forward()
if (check_pos_nc (pos, down_arrow_coor, 30, 40)):
motor_backward()
if (check_pos_nc (pos, left_arrow_coor, 40, 30)):
motor_left()
if (check_pos_nc (pos, right_arrow_coor, 40, 30)):
motor_right()
if(event.type == pygame.MOUSEBUTTONUP):
pos = pygame.mouse.get_pos()
# check at the end of the pushed and stop the motor
if (check_pos_nc (pos, up_arrow_coor, 30, 40)):
motor_stop_fb()
if (check_pos_nc (pos, down_arrow_coor, 30, 40)):
motor_stop_fb()
if (check_pos_nc (pos, left_arrow_coor, 40, 30)):
motor_stop_lr()
if (check_pos_nc (pos, right_arrow_coor, 40, 30)):
motor_stop_lr()
screen.fill(black)
for my_text, text_pos in my_buttons.items():
text_surface = my_font.render(my_text, True, white)
rect = text_surface.get_rect(center=text_pos)
screen.blit(text_surface, rect)
screen.blit(drop_button, drop_button_rect)
pygame.display.flip()
return temp_text
# Auto Mode for the claw machine with choosing the animal
def screen_4():
global pygame
global animal_text
temp_text = ""
my_font = pygame.font.Font(None, 20)
# pic is the top left corner of the picture
# word is the top left corner of the word
# center is the center of both the pic and word
#bear stuff
bear_coor_pic = (50, 100)
bear_center = (75, 120)
bear_word = (75, 170)
bear = pygame.image.load("Bear_clip_1.png")
bear_rect = bear.get_rect()
bear_rect = bear_rect.move(bear_coor_pic)
#frog stuff
frog_coor_pic = (140, 100)
frog_center = (165, 120)
frog_word = (165, 170)
frog = pygame.image.load("Frog_clip_1.png")
frog_rect = frog.get_rect()
frog_rect = frog_rect.move(frog_coor_pic)
#mouse stuff
mouse_coor_pic = (230, 95)
mouse_center = (250, 120)
mouse_word = (250, 170)
mouse = pygame.image.load("Mouse_clip_1.png")
mouse_rect = mouse.get_rect()
mouse_rect = mouse_rect.move(mouse_coor_pic)
prize_coor = (160, 50)
my_buttons = {'Pick a Prize':(prize_coor), 'Quit':(quit_coor), 'Bear': (bear_word), 'Frog': (frog_word), 'Mouse': (mouse_word)}
screen.fill(black) # Erase the Work space
for my_text, text_pos in my_buttons.items():
text_surface = my_font.render(my_text, True, white)
rect = text_surface.get_rect(center=text_pos)
screen.blit(text_surface, rect)
animal_text = 'none'
pygame.display.flip()
going = True
while (going):
# physical button quit
if (not GPIO.input(button_1)):
going = False
temp_text = "Quit"
for event in pygame.event.get():
if(event.type == pygame.MOUSEBUTTONDOWN):
pos = pygame.mouse.get_pos()
# screen button quit
if (check_pos(pos, quit_coor, 20)):
going = False
temp_text = "2" # go back to the idle screen
# Want Bear
if (check_pos(pos, bear_center, 25) or check_pos(pos, bear_word, 25)):
going = False
temp_text = "5"
animal_text = 'bear'
# Want Frog
if (check_pos(pos, frog_center, 25) or check_pos(pos, frog_word, 25)):
going = False
temp_text = "5"
animal_text = "frog"
# Want Mouse
if (check_pos_nc(pos, mouse_center, 20, 25) or check_pos(pos, mouse_word, 25)):
going = False
temp_text = "5"
animal_text = "mouse"
#update screen
screen.fill(black)
for my_text, text_pos in my_buttons.items():
text_surface = my_font.render(my_text, True, white)
rect = text_surface.get_rect(center=text_pos)
screen.blit(text_surface, rect)
screen.blit(bear, bear_rect)
screen.blit(frog, frog_rect)
screen.blit(mouse, mouse_rect)
#update screen
pygame.display.flip()
return temp_text
# Auto Mode with grabbing the animal
def screen_5():
global pygame
global lr_side
global fb_side
COUNTER = 5 # counter to reduce noise
#camera initalization
cap = PiVideoStream().start()
time.sleep(1)
# for detecting the frog
green_lower = np.array([30,50,150])
green_upper = np.array([70,255,255])
# for detecting the bear
yellow_lower = np.array([10,120,150])
yellow_upper = np.array([30,255,255])
# for detecting the mouse
red_lower = np.array([150,50,150])
red_upper = np.array([180,255,255])
red_lower_1 = np.array([0,50,150])
red_upper_1 = np.array([10,255,255])
going_1 = True #for the larger loop
# keep trying until the item has been gotten
while (item_dropped == 0 and going_1):
# initalization and resetting for next time
# color flips when the color is detected
# color_counter counts how many time that the color has been picked up
# colorx,colory is the coordinate of the that color
# find_animal is flipped when the color_counter is greater than the counter, meaning we are sure that the animal is there
# mouse stuff
red = 0
red_counter = 0
rx, ry = 0, 0
find_mouse = 0
# frog stuff
gx, gy = 0, 0
green = 0
green_counter = 0
find_frog = 0
# bear stuff
yx, yy = 0, 0
yellow = 0
yellow_counter = 0
find_bear = 0
last_part = False # when the item is within the radius of being picked up
finished = False # item has been picked up
step = 0 # for searching mode
searching = True # in searching mode
going = True #resetting again
while (GPIO.input(button_1) and going):
# physical quit button
if (not GPIO.input(button_1)):
going = False
going_1 = False
temp_text = "Quit"
# checking if one of limit switch are being hit
if (not GPIO.input(lr_limit_switch)):
if (lr_side == 'none'):
motor_stop_lr()
lr_side = moving_lr
else:
lr_side = 'none'
if (not GPIO.input(fb_limit_switch)):
if (fb_side == 'none'):
motor_stop_fb()
fb_side = moving_fb
else:
fb_side = 'none'
# get the next image
screen.fill([0,0,0])
frame = cap.read()
# find the center of the color if the color is there
# for frog
hsv_g = cv2.cvtColor(frame, cv2.COLOR_BGR2HSV) # switch the image from BGR to HSV
# make a mask where if the color of the pixel is within the range that we want, set it to white; otherwise set the pixel to black
mask_green = cv2.inRange(hsv_g, green_lower, green_upper)
res = cv2.bitwise_and(frame,frame, mask = mask_green)
e, f = np.where(mask_green == 255) # find the coordinates of all the pixel with the color of white
if len(e) > 1000: #when the number of pixels is more than 1000, find the average of all the pixel
green = 1 #flip the color bit saying that we found the color
gx, gy = np.average(e), np.average(f)
# for bear
hsv_y = cv2.cvtColor(frame, cv2.COLOR_BGR2HSV)
mask_yellow = cv2.inRange(hsv_y, yellow_lower, yellow_upper)
res = cv2.bitwise_and(frame,frame, mask = mask_yellow)
c, d = np.where(mask_yellow == 255)
if len(c) > 1000:
yellow = 1
yx, yy = np.average(c), np.average(d)
# for mouse
# the red color is at the edge of the hsv scale, as such we need to different mask to pick up both
hsv_r = cv2.cvtColor(frame, cv2.COLOR_BGR2HSV)
mask_red = cv2.inRange(hsv_r, red_lower, red_upper)
mask_red_1 = cv2.inRange(hsv_r, red_lower_1, red_upper_1)
res = cv2.bitwise_and(frame,frame, mask = mask_red)
res = cv2.bitwise_and(frame,frame, mask = mask_red_1)
a, b = np.where(mask_red == 255)
a_1, b_1 = np.where(mask_red_1 == 255)
a = np.append(a, a_1)
b = np.append(b, b_1)
if len(a) > 1000:
red = 1
rx, ry = np.average(a), np.average(b)
# add to the counter if we found it again, if we didn't find it, then set the counter back to 0
# helps reduce the noise that we found it or not
# for frog
if (green == 1):
green_counter += 1
else:
green_counter = 0
find_frog = 0
if (not last_part and animal_text == 'frog'):
searching = True # set back to True since we lost the animal
# for bear
if (yellow == 1):
yellow_counter += 1
else:
yellow_counter = 0
find_bear = 0
if (not last_part and animal_text == 'bear'):
searching = True
# for mouse
if (red == 1):
red_counter += 1
else:
red_counter = 0
find_mouse = 0
if (not last_part and animal_text == 'mouse'):
searching = True
# if the color counter is more than counter that means that the animal has been detected
# frog stuff
if (green_counter > COUNTER):
cv2.circle(frame,(int(gy), int(gx)), 5, (0,255,0), 5) # show the center of the colors (and hopefully the center of the animal)
find_frog = 1
if (animal_text == 'frog'):
searching = False # set to False since we found the animal
# bear stuff
if (yellow_counter > COUNTER):
find_bear = 1
cv2.circle(frame,(int(yy), int(yx)), 5, (255,0,0), 5)
if (animal_text == 'bear'):
searching = False
# mouse stuff
if (red_counter > COUNTER):
find_mouse = 1
cv2.circle(frame,(int(ry), int(rx)), 5, (0,0,255), 5)
if (animal_text == 'mouse'):
searching = False
# try to get the animal into the center of the screen
# frog stuff
if (find_frog == 1 and animal_text == 'frog' and not last_part and not searching and not finished):
last_part = range_check_motor(gx, gy)
# bear stuff
if (find_bear == 1 and animal_text == 'bear' and not last_part and not searching and not finished):
last_part = range_check_motor(yx, yy)
# mouse stuff
if (find_mouse == 1 and animal_text == 'mouse' and not last_part and not searching and not finished):
last_part = range_check_motor(rx, ry)
# since the camera is off-center, we need to move the claw a bit to the right to get the animal into the center of the claw
# and then drop the claw
if (last_part and not finished):
motor_right()
start_right_time = time.time()
while (time.time() - start_right_time < 5):
# set the limit switch just in case
if (not GPIO.input(lr_limit_switch)):
lr_side = 'right'
drop_command()
finished = True
# once the animal been picked up, start moving the claw to the bucket
# once the claw is at the bucket, drop the claw and check if the bitstream sensor picked up something
if (finished):
while(GPIO.input(lr_limit_switch) or GPIO.input(fb_limit_switch)):
if (GPIO.input(lr_limit_switch)):
motor_left()
else:
motor_stop_lr()
if (GPIO.input(fb_limit_switch)):
motor_backward()
else:
motor_stop_fb()
drop_lite_command()
if (item_dropped == 1):
going = False
going_1 = False
temp_text = '8' # go the congratulations screen
else:
going = False # restart finding the item
# if you are searching at the moment then check which step are you at
# step 0 - move forward
# step 1 - move right
# step 2 - move backward
# step 3 - move left
if (step == 0 and fb_side != 'forward' and searching):
motor_stop_lr()
motor_forward()
if (step == 0 and fb_side == 'forward' and searching):
motor_stop()
motor_right()
step = 1
if (step == 1 and lr_side != 'right' and searching):
motor_stop_fb()
motor_right()
if (step == 1 and lr_side == 'right' and searching):
motor_stop()
motor_backward()
step = 2
if (step == 2 and fb_side != 'backward' and searching):
motor_stop_lr()
motor_backward()
if (step == 2 and fb_side == 'backward' and searching):
motor_stop()
motor_left()
step = 3
if (step == 3 and lr_side != 'left' and searching):
motor_stop_fb()
motor_left()
if (step == 3 and lr_side == 'left' and searching):
motor_stop()
temp_text = '12' # at the end of searching, go to I can't find it screen
going = False
going_1 = False
# flip the color bit back
green = 0
red = 0
yellow = 0
# The video uses BGR colors and PyGame needs RGB
frame = cv2.cvtColor(frame, cv2.COLOR_BGR2RGB)
# resize
frame = imutils.resize(frame,width=320)
frame = cv2.flip(frame,1)
#for some reasons the frames appeared inverted
frame = np.fliplr(frame)
frame = np.rot90(frame)
surf = pygame.surfarray.make_surface(frame)
# Show the camera image on the PyGame surface!
screen.blit(surf, (0,0))
pygame.display.flip()
cap.stop()
cv2.destroyAllWindows()
return temp_text
# Accelerator Mode Screen
def screen_6(conn):
global pygame
global lr_side
global fb_side
going = True # loop until we are ready to leave
time_out = 120 # 2 minute time out
#camera initalization
cap = PiVideoStream().start()
time.sleep(1)
try:
# trash all the value that it has gotten at the moment
buffer = conn.recv(4096)
start_screen = time.time()
while (going):
# physical quit button
if (not GPIO.input(button_1)):
going = False
temp_text = "Quit"
#switch to a different screen when it time out
if (time.time() - start_screen > time_out):
going = False
temp_text = "11" # switch to the time-out screen
#switch to a differnt screen when it detect a item dropped
if (item_dropped == 1):
going = False
temp_text = '8' # switch to the congratulations screen
#
if (not GPIO.input(lr_limit_switch)):
if (lr_side == 'none'):
motor_stop_lr()
lr_side = moving_lr
else:
lr_side = 'none'
if (not GPIO.input(fb_limit_switch)):
if (fb_side == 'none'):
motor_stop_fb()
fb_side = moving_fb
else:
fb_side = 'none'
# get the next image
screen.fill([0,0,0])
frame = cap.read()
time.sleep(0.025) # sleep so that the buffer have time to reach from the other socket to this socket
buffer = conn.recv(4096) # receive the buffer
buffer = buffer.decode('utf-8')
buffer = buffer.split(',') # split the value from the buffer based on the commas
# go through each word in the buffer
for i in range(len(buffer)):
if ((buffer[i]) == 'quit'): #if there's a quit in the buffer, leave the screen
temp_text = '7' # switch to the you lose screen
going = False
else:
if (str(buffer[i]) != ''):
which_way = str(buffer[i]) #get the last word of the buffer
# depending on the last word of the buffer, do a command
if (which_way == 'drop'):
drop_command()
if (which_way == 'forward'):
motor_forward()
if (which_way == 'backward'):
motor_backward()
if (which_way == 'left'):
motor_left()
if (which_way == 'right'):
motor_right()
if (which_way == 'flat'):
motor_stop()
# The video uses BGR colors and PyGame needs RGB
frame = cv2.cvtColor(frame, cv2.COLOR_BGR2RGB)
# resize
frame = imutils.resize(frame,width=320)
frame = cv2.flip(frame,1)
#for some reasons the frames appeared inverted
frame = np.fliplr(frame)
frame = np.rot90(frame)
surf = pygame.surfarray.make_surface(frame)
# Show the camera image on the PyGame surface!
screen.blit(surf, (0,0))
pygame.display.flip()
except Exception as err:
motor_stop()
cap.stop()
cv2.destroyAllWindows()
print(f"Closing Connection due to exception {err=}, {type(err)=}")
motor_stop()
cap.stop()
cv2.destroyAllWindows()
print("Closing Connection due to ending")
return temp_text
# Lose Screen
def screen_7():
global pygame
global lr_side
global fb_side
temp_text = ""
my_font = pygame.font.Font(None, 20)
my_buttons = {"Sorry, You Lose":(160,100)}
screen.fill(black) # Erase the Work space
for my_text, text_pos in my_buttons.items():
text_surface = my_font.render(my_text, True, white)
rect = text_surface.get_rect(center=text_pos)
screen.blit(text_surface, rect)
bigbetha = my_font.render("Please Touch The Screen to Continue", True, white)
bigbetha_pos= bigbetha.get_rect(center=(160,120))
pygame.display.flip()
going = True
# reset position
motor_start()
while(GPIO.input(lr_limit_switch) or GPIO.input(fb_limit_switch)):
if (GPIO.input(lr_limit_switch)):
motor_left()
else:
motor_stop_lr()
if (GPIO.input(fb_limit_switch)):
motor_backward()
else:
motor_stop_fb()
lr_side = 'left'
fb_side = 'backward'
motor_stop()
while (going):
# physical button quit
if (not GPIO.input(button_1)):
going = False
temp_text = "Quit"
for event in pygame.event.get():
# pushing anywhere on the screen to move back to the idle screen
if(event.type == pygame.MOUSEBUTTONDOWN):
going = False
temp_text = '2'
screen.fill(black)
for my_text, text_pos in my_buttons.items():
text_surface = my_font.render(my_text, True, white)
rect = text_surface.get_rect(center=text_pos)
screen.blit(text_surface, rect)
screen.blit(bigbetha, bigbetha_pos)
#update screen
pygame.display.flip()
return temp_text
# Win Screen
def screen_8():
global pygame
global lr_side
global fb_side
temp_text = ""
my_font = pygame.font.Font(None, 20)
my_buttons = {"Congratulations, You Win!":(160,100)}
screen.fill(black) # Erase the Work space
for my_text, text_pos in my_buttons.items():
text_surface = my_font.render(my_text, True, white)
rect = text_surface.get_rect(center=text_pos)
screen.blit(text_surface, rect)
bigbetha = my_font.render("Please Touch The Screen to Continue", True, white)
bigbetha_pos= bigbetha.get_rect(center=(160,120))
pygame.display.flip()
going = True
# reset position
motor_start()
while(GPIO.input(lr_limit_switch) or GPIO.input(fb_limit_switch)):
if (GPIO.input(lr_limit_switch)):
motor_left()
else:
motor_stop_lr()
if (GPIO.input(fb_limit_switch)):
motor_backward()
else:
motor_stop_fb()
lr_side = 'left'
fb_side = 'backward'
motor_stop()
while (going):
# physical button quit
if (not GPIO.input(button_1)):
going = False
temp_text = "Quit"
# pushing anywhere on the screen to move back to the idle screen
for event in pygame.event.get():
if(event.type == pygame.MOUSEBUTTONDOWN):
going = False
temp_text = '2'
screen.fill(black)
for my_text, text_pos in my_buttons.items():
text_surface = my_font.render(my_text, True, white)
rect = text_surface.get_rect(center=text_pos)
screen.blit(text_surface, rect)
screen.blit(bigbetha, bigbetha_pos)
#update screen
pygame.display.flip()
return temp_text
# End Screen
def screen_9():
global pygame
global lr_side
global fb_side
my_font = pygame.font.Font(None, 20)
my_buttons = {"Thank you for Playing!":(160,100)}
screen.fill(black) # Erase the Work space
for my_text, text_pos in my_buttons.items():
text_surface = my_font.render(my_text, True, white)
rect = text_surface.get_rect(center=text_pos)
screen.blit(text_surface, rect)
bigbetha = my_font.render("Please Touch The Screen to End", True, white)
bigbetha_pos= bigbetha.get_rect(center=(160,120))
pygame.display.flip()
going = True
# reset position
motor_start()
while(GPIO.input(lr_limit_switch) or GPIO.input(fb_limit_switch)):
if (GPIO.input(lr_limit_switch)):
motor_left()
else:
motor_stop_lr()
if (GPIO.input(fb_limit_switch)):
motor_backward()
else:
motor_stop_fb()
lr_side = 'left'
fb_side = 'backward'
motor_stop()
while (going):
# physical button quit
if (not GPIO.input(button_1)):
going = False
for event in pygame.event.get():
# pushing anywhere on the screen to end the program
if(event.type == pygame.MOUSEBUTTONDOWN):
going = False
screen.fill(black)
for my_text, text_pos in my_buttons.items():
text_surface = my_font.render(my_text, True, white)
rect = text_surface.get_rect(center=text_pos)
screen.blit(text_surface, rect)
screen.blit(bigbetha, bigbetha_pos)
#update screen
pygame.display.flip()
return
#Start Screen
def screen_10():
global pygame
global lr_side
global fb_side
my_font = pygame.font.Font(None, 20)
my_buttons = {"Please Wait":(160,100)}
screen.fill(black) # Erase the Work space
for my_text, text_pos in my_buttons.items():
text_surface = my_font.render(my_text, True, white)
rect = text_surface.get_rect(center=text_pos)
screen.blit(text_surface, rect)
pygame.display.flip()
# reset position
motor_start()
while(GPIO.input(lr_limit_switch) or GPIO.input(fb_limit_switch)):
if (GPIO.input(fb_limit_switch)):
motor_backward()
else:
motor_stop_fb()
if (GPIO.input(lr_limit_switch)):
motor_left()
else:
motor_stop_lr()
lr_side = 'left'
fb_side = 'backward'
motor_stop()
return
# Time-Out Screen
def screen_11():
global pygame
temp_text = ""
my_font = pygame.font.Font(None, 20)
my_buttons = {"Time Out!":(160,100)}
screen.fill(black) # Erase the Work space
for my_text, text_pos in my_buttons.items():
text_surface = my_font.render(my_text, True, white)
rect = text_surface.get_rect(center=text_pos)
screen.blit(text_surface, rect)
pygame.display.flip()
drop_lite_command()
if (item_dropped == 1):
temp_text = '8' # go to congratulations screen
else:
temp_text = '7' # go to sorry screen
return temp_text
# Can't Find Item Screen
def screen_12():
global pygame
global lr_side
global fb_side
temp_text = ""
my_font = pygame.font.Font(None, 20)
my_buttons = {"Sorry, the object isn't in the Claw Machine":(160,100)}
screen.fill(black) # Erase the Work space
for my_text, text_pos in my_buttons.items():
text_surface = my_font.render(my_text, True, white)
rect = text_surface.get_rect(center=text_pos)
screen.blit(text_surface, rect)
bigbetha = my_font.render("Please Touch The Screen to Continue", True, white)
bigbetha_pos= bigbetha.get_rect(center=(160,120))
pygame.display.flip()
going = True
# reset position
motor_start()
while(GPIO.input(lr_limit_switch) or GPIO.input(fb_limit_switch)):
if (GPIO.input(lr_limit_switch)):
motor_left()
else:
motor_stop_lr()
if (GPIO.input(fb_limit_switch)):
motor_backward()
else:
motor_stop_fb()
lr_side = 'left'
fb_side = 'backward'
motor_stop()
while (going):
# physical button quit
if (not GPIO.input(button_1)):
going = False
temp_text = "Quit"
# pushing anywhere on the screen to move back to the idle screen
for event in pygame.event.get():
if(event.type == pygame.MOUSEBUTTONDOWN):
going = False
temp_text = '2'
screen.fill(black)
for my_text, text_pos in my_buttons.items():
text_surface = my_font.render(my_text, True, white)
rect = text_surface.get_rect(center=text_pos)
screen.blit(text_surface, rect)
screen.blit(bigbetha, bigbetha_pos)
#update screen
pygame.display.flip()
return temp_text
# IP Screen
def screen_13(ip_text):
global pygame
ip_string = "Please connect at this address: " + str(ip_text)
my_font = pygame.font.Font(None, 20)
my_buttons = {ip_string:(160,100)}
screen.fill(black) # Erase the Work space
for my_text, text_pos in my_buttons.items():
text_surface = my_font.render(my_text, True, white)
rect = text_surface.get_rect(center=text_pos)
screen.blit(text_surface, rect)
HOST = str(ip_text)
PORT = 32323
pygame.display.flip()
sock = socket.socket(socket.AF_INET, socket.SOCK_STREAM)
sock.bind((HOST, PORT)) #wait here until the two Raspberry Pi connects
sock.listen(1)
conn, addr = sock.accept()
return conn, addr
if __name__=='__main__':
motor_stop()
s = socket.socket(socket.AF_INET, socket.SOCK_DGRAM)
s.connect(('8.8.8.8', 1)) # connect() for UDP doesn't send packets
local_ip_address = s.getsockname()[0] # get the IP Address that the Raspberry Pi is on
conn, addr = screen_13(local_ip_address) # IP Screen
screen_10() # Start Screen
big_going = True
screen_num = '2'
while(big_going):
if (screen_num == '2'):
screen_num = screen_2() # Idle Screen
elif (screen_num == '3'):
screen_num = screen_3() # Manual Mode
elif (screen_num == '4'):
screen_num = screen_4() # Auto Mode Part 1
elif (screen_num == '5'):
screen_num = screen_5() # Auto Mode Part 2
elif (screen_num == '6'):
screen_num = screen_6(conn) # Accelerator Mode
elif (screen_num == '7'):
screen_num = screen_7() # Lose Screen
elif (screen_num == '8'):
screen_num = screen_8() # Win Screen
elif (screen_num == '11'):
screen_num = screen_11() # Time-Out Screen
elif (screen_num == '12'):
screen_num = screen_12() # Can't Find Item Screen
else: #usually 'quit'
big_going = False
screen_9() # End Screen
motor_stop()
GPIO.cleanup()
conn.close()
###############################################################################
# wifi_client.py
#
# Authors: Victoria Hathaway (vh226)
# Lily Yu (gly6)
#
# Date: December 12th 2022
#
# Description:
# This script will connect to the other Raspberry Pi and then send it the acclerator data
###############################################################################
import socket
import time
import RPi.GPIO as GPIO
import adafruit_mma8451
import board
HOST = "10.49.49.199" #change if need
# set up for the two buttons
button_1 = 18 # quit button
button_2 = 17 # drop button
GPIO.setmode(GPIO.BCM)
GPIO.setup(button_1, GPIO.IN, pull_up_down=GPIO.PUD_UP)
GPIO.setup(button_2, GPIO.IN, pull_up_down=GPIO.PUD_UP)
# set up for the acclerator
i2c = board.I2C()
sensor = adafruit_mma8451.MMA8451(i2c)
# max_min for how the board is tilled
forward_min = -10
forward_max = -4
backward_min = 4
backward_max = 10
left_min = 4
left_max = 10
right_min = -10
right_max = -4
# check if the tilling is within range of how the board is tilled
def min_max_variable(min, max, x):
if (x > min and x < max):
return True
return False
sock = socket.socket(socket.AF_INET, socket.SOCK_STREAM)
PORT = 32323
sock.connect((HOST, PORT)) #wait here until the two Raspberry Pi connects
try:
while(True):
time.sleep(0.025)
x, y, z = sensor.acceleration
# physical quit button
if (not GPIO.input(button_1)):
message = 'quit,'
sock.sendall(message.encode())
# physical drop button
elif (not GPIO.input(button_2)):
message = 'drop,'
sock.sendall(message.encode())
# check if the board is flat
elif (min_max_variable(right_max, left_min, x) and min_max_variable(forward_max, backward_min, y)):
message = 'flat,'
sock.sendall(message.encode())
else:
if (min_max_variable(forward_min, forward_max, y)):
message = 'forward,'
sock.sendall(message.encode())
elif (min_max_variable(backward_min, backward_max, y)):
message = 'backward,'
sock.sendall(message.encode())
elif (min_max_variable(left_min, left_max, x)):
message = 'left,'
sock.sendall(message.encode())
elif (min_max_variable(right_min, right_max, x)):
message = 'right,'
sock.sendall(message.encode())
else:
message = 'x,'
sock.sendall(message.encode())
except Exception as err:
print(f"Closing sock due to exception {err =}, {type(err)=}")
sock.close()
print("Closing sock due to ending")
sock.close()